DataStage Installation
Before starting Data Stage installation,You need to run ISALite so that you can verify that your server fulfill all the requirements for datastage installation.
- Download ISALite as per your OS and run ISALite.exe .
- Run ISAlite and save the output in a file.
- Read the output file to see if there is any failure.If there is any failure in the output report then resolve it before installing datastage.
Prerequisites
- It is recommended that you should install datastage in /opt/IBM/InformationServer.
- InformationServer should be empty before installation.Otherwise Installation will give error.
- You should have all these accounts on the server before starting installation.These accounts should be local on the server.
| Userid |
Group |
Description |
| dsadm |
dstage |
This
account will be Administrator for
the InfoSphere Information Server
engine |
| xmeta |
dstage |
Metadata repository
owner |
| xmetasr |
dstage |
Staging area user |
| iauser |
db2sadm1 (Local
group) |
Owner of the
Information Analyzer analysis
database |
| srduser |
dstage |
Owner of the
QualityStage Standardization Rules
Designer database |
| db2inst1 |
db2iadm1 (Local
group) |
DB2 instance owner |
| db2fenc1 |
db2fadm1 (Local
group) |
DB2 fenced user |
dsodb
|
dstage |
Owner of the
operations database |
Other than these users you need two more users isadmin and wasadmin.These accounts can be LDAP/AD accounts.
4. You need below privileges to install Datastage on different OS.
Operating system Accounts
AIX® The root user account.
Linux
Solaris
Windows
A user account in the local Administrators group. This account must be one of the following types:
A local account that is directly assigned to the Windows local Administrators group. A domain account that is directly assigned to the Windows local Administrators group.
5. You have to decide before installation that if you want to use DB2 as repository or you want to use some other DB.You have to choose this option during installation.
6. Before installation,You need to install all the required clients for all the database which you will use as data source or repository.
Steps for DataStage Installation
1. In the newly created session, run the following command to clear any Java™ options that might be set.
Linux
(i) In the sh or bash shell:
export IBM_JAVA_OPTIONS=
(ii) In the csh or tcsh shell:
unsetenv IBM_JAVA_OPTIONS
2. AIX Solaris Linux: Configure the following settings for the session to help ensure that the installation is successful:
(i) Set the file creation mask to 022:
umask 022
You can just type umask,It will show you what umask properties are set.
(ii) Ensure that you have no less than 10240 file descriptor resources allocated.
You can type ulimit -n to see what properties are set
(iii) Check that the current setting for the NOFILES kernel parameter is set to a value that is at least equal to the value that you specify for ulimit.
3. Extract the installation package. For example
Linux
tar zxvf is-suite.*.tar.gz
The package is named is-suite.* for the full product or is-client.* for the client only.
4. The is-suite images require the use of a Bundle Entitlement package; the is-client images do not. If you are installing an is-suite image, extract the contents of the entitlement package into the is-suite directory that is decompressed in the previous step. Ensure that you have downloaded the correct entitlement package for your operating system platform, licensed products, and suite installation package. A suite entitlement package will only work for a suite installation package. For example:
unzip -d is-suite Bundle.suite.*.zip
5. Change to the is-suite or is-client directory.
6. Run the installation program:
Operating system Command
AIX Solaris ./setup [-verbose]
Linux ./setup [-verbose]
7. The -verbose option is optional. The option causes the installation program to display log messages to the console and also write them to the log file. If the -verbose option is not specified, log messages are written to the log file only.
Several messages are displayed. The program then displays a message about how to access the installation wizard:
======> Enter the following URL to your web browser to begin the
installation process:
https://localhost:8443/ISInstall
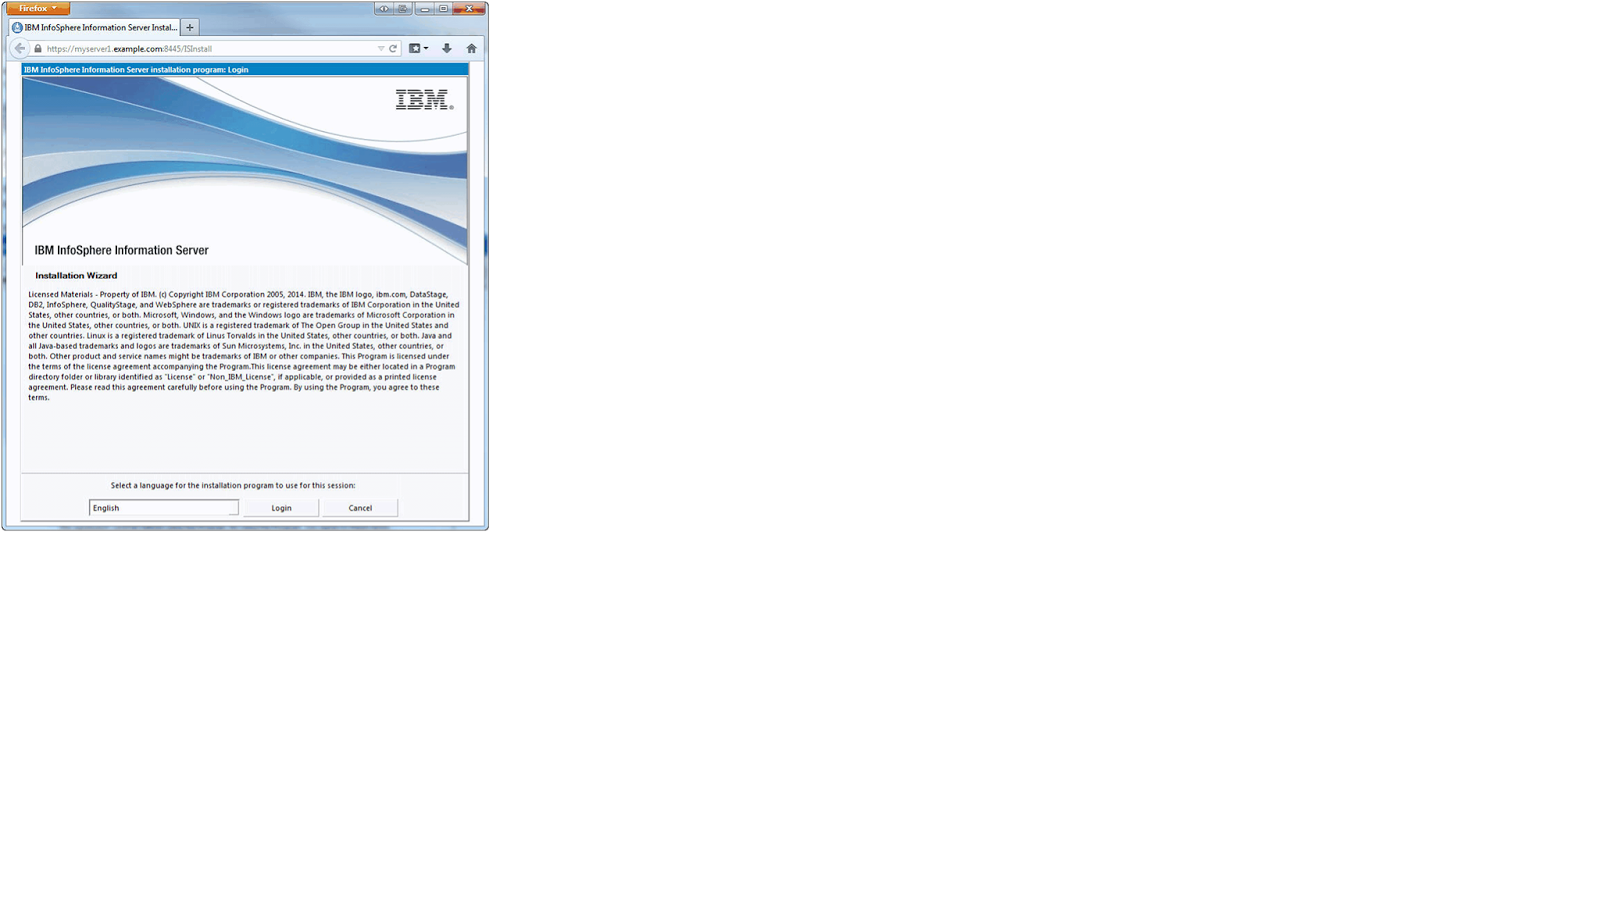
8. Open a web browser on the computer or on a remote computer, and navigate to the URL that is listed in the message from starting the installation program. (Use the full host name if using a remote browser.)
9.

10. A message might appear in the browser that reads "The publisher cannot be verified..." You can safely ignore the message and continue the installation. This message does not indicate a security risk when it appears during InfoSphere® Information Server installation.
- Select a language from the menu for the installation program to use, and click Login.
- This selection applies only to this installation session. Later in the installation process, you select the language to apply to the InfoSphere Information Server installation.
- Follow the prompts in the installation program to continue installing the product.
- The installation program runs an early prerequisites check to ensure that your installation is configured correctly.
- The wizard page displays each check. If the check fails, it is marked FAILED in the page. If the check found issues that might cause problems with the installation, it is marked WARNING in the page.
11. When all prerequisites checks pass, continue to follow the prompts in the installation program.
12. You can follow the progress of the IBM® InfoSphere® Information Server suite installation by monitoring the installation log files.
Open the log file:
Use the tail command tail -f ISInstall*.log
ISInstall*.log is the log file with the most recent date timestamp.
Log file should exist at /opt/IBM/InformationServer/logs.
You can monitor the installation of the following InfoSphere DataStage components:
• InfoSphere DataStage plug-ins
• Parallel engine operators
• Connectors
Open the log file at /opt/IBM/InformationServer/Server/StagingArea/Log
After Installation Steps
1. Installing the new version of InfoSphere Information Server on the client computer
2.Use IBM® Support Assistant Lite for InfoSphere® Information Server (ISA Lite for InfoSphere Information Server) to run diagnostic tests and generate reports that confirm the stability of the installation environment.
Generate the Diagnostic Health Checker reports
Note: If you already have ISALite installed, verify that it's the latest version. To verify the version that you have installed:
• On Linux and Unix computers, issue the ./runISALite.sh -version command from the install_dir/ISALite directory.
3. Check if components are running after installation.
datastage
Cd /opt/IBM/InformationServer/Server/DSEngine
ps -eaf | grep dsrpc
websphere
ps -eaf | egrep -i "java"
ASB Node
ps -ef | grep -i agent
(ii). Check version.xml file for success.
Go to Cd /opt/IBM/InformationServer
Cat version.xml
(iii). Check the version installed
Cd /opt/IBM/InformationServer/Server/DSEngine
cat .dsrel
8.7.0.0
4. Saving InfoSphere DataStage settings files
Procedure
(i).
Complete these steps to save the required settings files: If you are installing datastage on a different server,You don't need to copy these files to some other location.You can copy the contents of these files from old server to new later.
a. Copy the $DSHOME/dsenv file to a location that is outside of the InfoSphere DataStage file structure.(if you are installing new version on the same server)
b. To keep a record of the existing configuration and the configuration of the ODBC drivers, copy the following files to a location that is outside of the InfoSphere DataStage file structure:
- $DSHOME/.odbc.ini
- $DSHOME/uvodbc.config
- The uvodbc.config file that is located in each project directory
(ii). Complete these steps to save the required settings files:
a. Copy the DSParams file from each project directory to a safe location.
b. Copy the DSParams file from the Template project. For example, save the C:\Ascential\DataStage\Template\DSParams file.
c. Copy the $DSHOME\uvodbc.config file in the engine directory.
d. Copy the uvodbc.config file that is located in each project directory.
5. Check the basic connectivity with the databases to make sure everything is working fine.
To test basic connectivity with Oracle-
export Oracle_home variable
export Path variable.
sqlplus username@databasename
password
If you are able to connect then basic connectivity to oracle is working fine.
To Test Basic Connectivity with teradata--
You can use any teradata utility like bteq,fastload etc
bteq
.logon databasename/username
password
If you are able to connect then connectivity to teradata is working fine.If not then you may need to check if teradata client is installed properly on the server or not.
6. Now export/Import the projects
7. Make your dsadm and repository password no expiry if possible.This will reduce overhead of changing and updating passwords.